Shugga P's Gluten Free Goodness

This my food journal of making and eating delicious gluten free food


1 Comment

Chocolate Lava Cakes

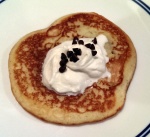
Wow are these awesome!  When reheated they weren’t quite as amazing, but they were still really great.  The rich chocolate center just oozes out and mixes with the (in this case) ice cream.  I think it would have been better with plain whipped cream, but Captain Console strongly disagrees.  I guess we’ll just have to make them again and serve them with whipped cream to find out- darn.

individual ramekins or aluminum foil muffin pans (6 cups each) IMAG0484
1/3 cup all-purpose flour
3 tablespoons unsweetened cocoa powder
1/4 teaspoon salt
5 ounces bittersweet chocolate, 4 ounces coarsely chopped, 1 ounce very finely chopped
1 stick (8 tablespoons) unsalted butter, cut into 8 pieces
2 large eggs, at room temperature
1 large egg yolk, at room temperature
6 tablespoons sugar

Center a rack in the oven and preheat the oven to 400 degrees F. Butter (or spray – it’s easier) 6 cups of a regular-size muffin pan, preferably a disposable aluminum foil pan. Put the muffin pan on a baking sheet.
Sift the flour, cocoa and salt together.

Use a double boiler to melt the coarsely chopped chocolate and the butter in the bowl and stir occasionally just until they are melted – you don’t want them to get so hot that the butter separates. Remove from the heat.
In a large bowl, whisk the eggs and yolk until homogenous. Add the sugar and whisk until well blended, about 2 minutes. Add the dry ingredients and, still using the whisk, stir (don’t beat) them into the eggs. Little by little, and using a light hand, stir in the melted chocolate and butter. Divide the batter evenly among the muffin cups and sprinkle the finely chopped chocolate over the batter.

Bake the cakes for 13 minutes. Transfer them, still on the baking sheet, to a rack to cool for 3 minutes. (There is no way to test that these cakes are properly baked, because the inside remains liquid.)
Line a cutting board with a silicone baking mat or parchment or wax paper, and, after the 3-minute rest, unmold the cakes onto the board. Use a wide metal spatual to lift the cakes onto dessert plates.

Serving: These should be served as soon as they are put on plates. The cakes are not meant to be served alone – they need something to play off their warm, gooey, soooooo chocolaty interior. Ice cream or whipped cream are good.
Storing: Although the whole point of a warm, runny cake is to eat it when it is warm and runny, the cake is still delicious, but different, the following day. If you wrap the cooled cakes in plastic wrap and keep them at room temperature, the next day the texture of the center of the cake (the part that was once gooey) will remind you of ganache. Eating the cake will be like enjoying a bonbon: it will be firm on the outside and creamy within.


Leave a comment

Chocolate Mousse

In an attempt to sneak more veggies into our meals, I made this chocolate mousse.  I made the Mexican style and you couldn’t even taste the avocados.  It was really delicious.

2 ripe avocadosIMAG0486
1/2 cup organic raw cacao powder
1/2 cup full fat coconut milk (or almond)
1/3 cup raw honey, to taste
2 teaspoons vanilla extract
3/4 teaspoon cinnamon ( for Mexican)
1/8 teaspoon ground ancho chile (for Mexican)

Combine all in food processor. Top with slivered almonds or fresh berries if desired.


Leave a comment

Almond Chocolate Chip Cookies

These flourless chocolate chip cookies were very good chewy cookies, even though they turned out flatter than I would have liked.

1 cup almond butterIMAG0360
1/2 cup light or dark brown sugar
1/2 cup granulated sugar
1 large egg
1 1/2 teaspoon baking soda
2 tablespoons maple syrup
1 teaspoon vanilla
Pinch of salt
1/2 cup slivered almonds
1/2 cup semisweet chocolate chips

Preheat oven to 350 degrees.
Grease a baking sheet with butter and set aside.
In a large bowl, stir almond butter and sugars together until well combined.
Add egg, baking soda, maple syrup, vanilla and salt and mix well. Stir in the almonds and chocolate chips.
Using a teaspoon, scoop out small, walnut-sized amounts of dough and roll them in your hands to form a ball. Place on cookie sheet about 1 inch apart. Bake 10 to 12 minutes, until lightly browned. Cool for 5 minutes.


Leave a comment

Chocolate Chip Pancakes

When Captain Console woke up this morning he said, “I want chocolate chip pancakes!”  So I made these pancakes by adapting the America’s Test Kitchen recipe for buttermilk pancakes. He topped them with homemade whipped cream.

IMAG0359

  • 5.25 oz. gluten free flour
  • 1/2 tsp salt
  • 1/2 tsp baking powder
  • 1/4 tsp baking soda
  • 2/3c milk
  • 1/2 tsp vanillaIMAG0361
  • 1 egg, separated
  • 2 Tbsp. butter, melted
  • 1 Tbsp sugar
  • 1/3c mini chocolate chips

Whisk the flour, salt, baking powder, and baking soda.  In a separate bowl combine the milk, vanilla, 1 egg yolk, and melted butter.

Using a hand mixer, whip the egg white until it forms soft billowy mounds.  Add the sugar and whip until glossy stiff peaks form.

Whisk together the liquid and dry ingredients until the batter thickens and no lumps remain.  Gently fold in the egg whites.

Heat some vegetable oil in a 12 in. skillet and let it heat up.  Fill a 1/2c measuring cup with batter and pour it in the skillet.  Quickly sprinkle some chocolate chips over the top.  Allow to cook until the bottom of the pancake is brown and the bubbles that form on the surface begin to stay pitted (2-3 min).  Flip and allow to cook until the bottom browns.


Leave a comment

Chocolate Hazelnut Cheesecake

DSCN5532
This is a super simple cheesecake.  You can skip the step of grinding the nuts with the crust if you want. For the crust we usually just use my homemade chocolate cookies instead of the graham crackers.  I’ve also easily made this into a Chocolate Peanut butter  Cheesecake by replacing the Nutella with Chocolate Peanut butter spread. 
  • 8 ounces graham crackers (about 2 cups crumbs)
  • 5 tablespoons soft unsalted butter
  • 1 13-ounce jar Nutella or equivalent chocolate hazelnut spread, at room temperature
  • 3/4 cup chopped toasted hazelnuts
  • 1 pound cream cheese, at room temperature
  • 1/2 cup confectioners’ sugar, sifted
  • 9 -inch springform cake pan
  1. Break the crackers into the bowl of a food processor, then add the butter and 1 tablespoon of Nutella and blitz until the mixture starts to clump. Add 3 tablespoons of the toasted hazelnuts, and continue to pulse until you have a damp, sandy mixture.
  2. Tip this into your springform pan and press it into the base, using either your hands or the back of a spoon. Place in the refrigerator to chill while you get on with the filling.
  3. Beat together the cream cheese and confectioners’ sugar until smooth and soft, then scrape the rest of the Nutella out of its jar and into the cream cheese mixture and continue beating until combined.
  4. Take the springform pan out of the refrigerator. Scrape and smooth the Nutella mixture over the cracker crumb base and scatter the remaining chopped hazelnuts on top to cover. Place the pan in the refrigerator for at least 4 hours or overnight.
  5. Serve straight from the refrigerator for best results, unspringing the cake from the pan, still on its base, just before you eat. To cut it, dip a sharp knife in cold water, wiping it and dipping again between each cut. And don’t worry: It may look disappointingly flat when whole, but when sliced, its dark depths are revealed.